Installation Guide
Installing Unity
The simulation environment is developed for Unity 6 (the latest tested version is 6000.3.6f1). All later LTS versions of Unity 6 should work as well.
To install this version, you can follow the instructions on the Unity download page. The steps are described in more detail below.
1. Install Unity Hub
The Unity Hub is an application that manages your Unity installs and projects.
- For Windows and Mac: Download the correct installer from the download page and run it.
- For Linux: Follow the instructions on the Linux installation page.
2. Get a Unity Account and License
- You will need to create a Unity profile and obtain a free license to proceed
- When starting Unity Hub, you will be prompted to sign in or create an account
- Follow the instructions and agree to the Editor Software Terms to activate a Personal license
- This support page also shows these steps
3. Install Unity Editor and an IDE
- The Unity Hub will prompt you to install an Editor. This is the Unity environment in which the simulator project must be opened.
- If the recommended editor has major version 6, it should be compatible with the simulator
- Otherwise, skip the installation and check the troubleshooting section to see how you can install the correct Editor version
- In the "Add modules" window that appears during the installation, select the following modules:
- Under "Dev Tools", select Microsoft Visual Studio or another supported IDE that works on your platform
- Under "Platforms", select the Build Support option for your platform (Dedicated Server Build is not required)
- Also select "Documentation"
- Click "Install" and wait for the installation to finish
Note
When installing Microsoft Visual Studio, you may be prompted to select "Workloads" to install. Please select the "Game development with Unity" Workload.
When Unity has been installed successfully, you can move on to setting up the simulator.
Troubleshooting
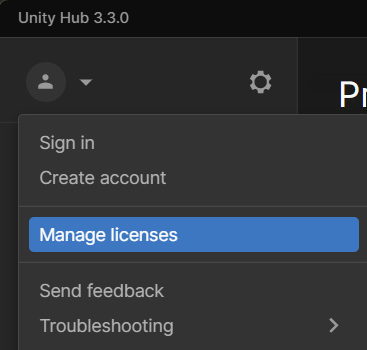
- If activating the license is not prompted immediately when opening Unity Hub, this can be done by clicking the profile button in the top-left corner and selecting "Manage licenses"

- If the recommended Unity Editor's major version is not 6 or the simulation environment does not work in your installed Editor, you can skip the installation at first and download the correct version later
- Open the download archive
- Find the Unity Editor version 6000.3.6f1. This is the currently supported version of the simulator
- The "Install" button will open the Unity Hub, after which you can proceed as described above
- Alternatively, in Unity Hub under the "Installs" tab, press "Install Editor" and select "Archive" or find the correct version under "Official releases"
- If the module selection window does not open when installing the Editor, you can add modules later on:
- In the "Installs" tab of the Unity Hub, find your installed Editor version and click on the gear icon
- Then select "Add modules" and select the modules that are still missing
- If some of the modules are not installed successfully (such as Visual Studio):
- Close Unity Hub (make sure to quit the application completely, it may remain in the system tray if you only close the window)
- Launch Unity Hub as administrator
- If the Editor installation failed, follow the instructions in step 2
- If the Editor was installed already but some modules are missing, follow the above instructions for adding modules to an existing install
- If Visual Studio still cannot be installed via modules, you can also install it manually
- Make sure to select the "Game development with Unity" Workload in the installer
- You may have to configure Unity to use Visual Studio as default editor manually (see simulator setup)